
So, here goes:
1. When you purchase your place mat be careful not to get one that is too floppy or one that is too stiff. You want one that is somewhere in between. You want it to have enough stiffness to stand up in your purse, but not so stiff that you can't sew through four thicknesses. I have done both!!!!
2. I've broken lots of needles. You really need to have a jeans needle or some other really heavy duty needle. 4. If you decide you want yours to be deep, fold the place mat hamburger style, that is, with the short sides together.
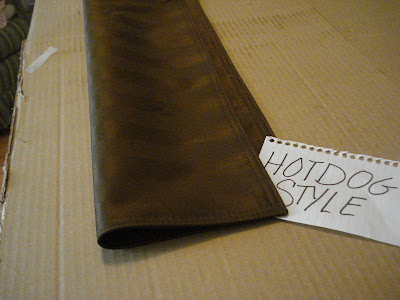 5. If you want yours to be shallow, fold your place mat hotdog style, or, with the long sides together.
 6. Actually, you don't have to have the sides even. I like to fold it so that there is about an inch left on one edge (for the hamburger fold you could leave about 2 inches.) But, if you want both sides the same depth you can fold them evenly. That is how I've done most of mine, but lately, I've decided I like for my cell phone to be in a pocket deep enough for it to stay, but one that I can get it out of easily. I don't like for my credit cards, etc... to be in one that is so shallow that they fall out. Disaster!!!
 7. Then you fold it in the center so the two edges are on the outside of the center fold where they all meet. You are folding accordion style here; remember the paper fans we made in elementary school?
 8. You have more options at this point. You may want to sew sections that are different sizes on each side. If you do, open it at the center fold, and only sew through two thicknesses until you reach the center where the edges meet. Then, you may want to sew different sized sections on the other side. If so, just do the same from the other folded side. I hope this is making sense. You can make it so that the pockets on both sides are the same. If so, just sew through all four thicknesses. and skip this step.
  9. Then, once you get the different sized sections on each side, fold it in the center again so that you have four thicknesses. Now, sew through both ends, down the center, and anywhere else you want for the sizes you want your pockets to be. I always make one that a check book will fit in, another for my cell phone, another for credit cards, insurance cards, etc... I also like to have a section for my pens, my lipstick and chap stick. Then, there are extra sections for miscellaneous things. On this one, there is a pocket for my camera since I've started carrying it with me almost every where I go.
 My camera fits in the pocket on the far side where the white paper is sticking up. I just put the paper in to show that there is a pocket there. I also carry a small calendar which will fit in the same pocket with my check book, or one that size.


3. Decide if you want your organizer to be deep or shallow. I like the shallow for me because I always carry a shallow purse.
4. If you decide you want yours to be deep, fold the place mat hamburger style, that is, with the short sides together.5. If you want yours to be shallow, fold your place mat hotdog style, or, with the long sides together.6. Actually, you don't have to have the sides even. I like to fold it so that there is about an inch left on one edge (for the hamburger fold you could leave about 2 inches.) But, if you want both sides the same depth you can fold them evenly. That is how I've done most of mine, but lately, I've decided I like for my cell phone to be in a pocket deep enough for it to stay, but one that I can get it out of easily. I don't like for my credit cards, etc... to be in one that is so shallow that they fall out. Disaster!!!7. Then you fold it in the center so the two edges are on the outside of the center fold where they all meet. You are folding accordion style here; remember the paper fans we made in elementary school?8. You have more options at this point. You may want to sew sections that are different sizes on each side. If you do, open it at the center fold, and only sew through two thicknesses until you reach the center where the edges meet. Then, you may want to sew different sized sections on the other side. If so, just do the same from the other folded side. I hope this is making sense. You can make it so that the pockets on both sides are the same. If so, just sew through all four thicknesses. and skip this step.9. Then, once you get the different sized sections on each side, fold it in the center again so that you have four thicknesses. Now, sew through both ends, down the center, and anywhere else you want for the sizes you want your pockets to be. I always make one that a check book will fit in, another for my cell phone, another for credit cards, insurance cards, etc... I also like to have a section for my pens, my lipstick and chap stick. Then, there are extra sections for miscellaneous things. On this one, there is a pocket for my camera since I've started carrying it with me almost every where I go. My camera fits in the pocket on the far side where the white paper is sticking up. I just put the paper in to show that there is a pocket there. I also carry a small calendar which will fit in the same pocket with my check book, or one that size. 10. You could fancy this up with a ribbon loop on which to attach your keys, etc.....
11. Note that you can fold this even smaller along any of the sections to fit in almost any purse.
On a different note; as you know by now, if you've been reading my blog, I love old things. My friend found this tracing paper and tracing wheel in her stuff when she moved. She knew I would appreciate these. Look at that $.29 price tag!! Does anyone use tracing paper and tracing wheels anymore? I know I don't. My high school home ec. teacher required it, but I never used it if she wasn't going to catch me.
Now, on to Riley's Easter dress. These are the things I'm using on hers. These are antique, hand embroidered tea towels. Do you recognize the trim? I made it from the fabric that I used for Emory's dress. I used stabilizer and stitched close to the flower design. I just love these flowers. Her fabric is the same as Emory's under dress except in yellow. I hope I can get this done this week.


3 comments:
Julia that was too cool. Will have to put that on my list of things to try. I think they will make perfect and inexpensive gifts.
What a nifty idea!! You are so creative!
Thank you Julia. I will be putting this tutorial to use. Looking forward to seeing the next dress.
Post a Comment