"Ode to My Washing Machine"
Oh, my dear friend, my washing machine,
You've worked so hard for me.
You've washed my clothes and underwear
And once, even my car keys.
I've filled you full, up to the top
With towels, dish cloths and sheets.
I always put in pairs of socks
Then pray to get back one for both feet.
The other night you groaned and creaked.
I thought "Oh, what will I do?"
But, then you finished with that load;
That's what I've come to expect from you.
The next day you filled with water
and just sat and would not spin.
I turned you off and let you rest
Then I turned you on again.
You made a brave and valiant effort.
You spun around one turn.
Then you sputtered and stuttered before you stopped
For the last time. #$%@$&* Oh darn!
Of course, you sat with a load of towels
Soaking in water to the top.
I took them out one by one
And then made use of my mop.
I emptied your water cup by cup
And poured it down the sink.
It took a while, but now you're dry.
I'm starting to come back from the brink.
Tomorrow, you are going away
Forever, I'm sad to say,
And in your place there will be
A new washer for which I must pay!!
As you know, I love old things, except for broken washing machines. My daughters gave me
this beautiful sewing box! I love it. I usually keep it by my chair upstairs where I do most of my hand work. I keep scissors, a couple of colors of thread, embroidery thread and needles, etc... I just wanted you to see it and I didn't want to do a whole post without any photos.
I'm finished cutting out pants, a shirt, a jacket, and a hat for Little Man. Now, on to the sewing machine.


 As you see I made French seams again. I do on most of the girls' really dressy stuff, especially when the fabric is really thin.
 In the sleeve I added a piece of tulle gathered to give it some umph!!! I trimmed it very close to the seam so it won't scratch Riley's little shoulders. Since the fabric is so thin and soft the sleeves wouldn't puff enough to suit me. Sometimes I don't want puffy sleeves, but this time I did. I also did French seams when putting in the sleeves. I never had done that before I made this and Emory's dresses this year, but it gives such a finished look on the inside.
 As you see I put three little buttons. I like buttons in a special dress. I almost never do zippers. It depends if it's for play or dress up.
 As you see I inset two strips of the trim into the sleeves on a diagonal and made the sleeve band just like the trim around the hem with the ribbon on either side. I used a feather stitch down the center of the ribbon. I bought yards!!!! of this ribbon at a little store near me that has amazing prices on everything. I'm going to do a post on this place soon. The lady apologized that some of the fabric was $5.00 a YARD!!!!
  Instead of a slip I felt that this dress needed to be lined to give it a little more body. I hand embroidered a very simple design around the hem of the lining. I know that it will never show, but Riley will know it is there and that her Granmomma spent time on her.

 Then, when I finally did get to sew, things didn't work out like I had planned. I had intended to do scallops along the hemline with the trim that I made from the fabric I had left over from Emory's dress. There wasn't ANY GIVE in this trim so curves were out. Ok, I decided I would do straight lines. I was in such a funk and trying to hurry so I didn't do my neatest work, hence, the pinkish ribbon on either side of the hemline trim. Actually, I like it this way, so I guess that's a good thing. Nothing ever comes out like I envision anyway.
 Since I used the ribbon on the skirt I decided to add it to the collar too. Here is the collar unattached and unfinished. I love the little girl with her parasol.
  On Thursday morning I was late to work; I've never been late to work in all the years I've taught, but my DH forgot to turn on the alarm, and we overslept. It was no big deal, but it did throw me off for the whole day!!
 4. If you decide you want yours to be deep, fold the place mat hamburger style, that is, with the short sides together.
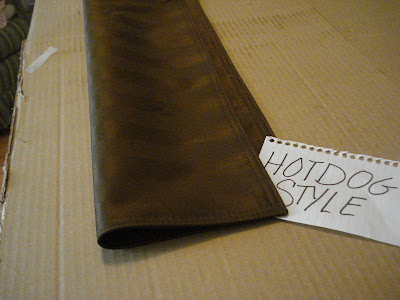 5. If you want yours to be shallow, fold your place mat hotdog style, or, with the long sides together.
 6. Actually, you don't have to have the sides even. I like to fold it so that there is about an inch left on one edge (for the hamburger fold you could leave about 2 inches.) But, if you want both sides the same depth you can fold them evenly. That is how I've done most of mine, but lately, I've decided I like for my cell phone to be in a pocket deep enough for it to stay, but one that I can get it out of easily. I don't like for my credit cards, etc... to be in one that is so shallow that they fall out. Disaster!!!
 7. Then you fold it in the center so the two edges are on the outside of the center fold where they all meet. You are folding accordion style here; remember the paper fans we made in elementary school?
 8. You have more options at this point. You may want to sew sections that are different sizes on each side. If you do, open it at the center fold, and only sew through two thicknesses until you reach the center where the edges meet. Then, you may want to sew different sized sections on the other side. If so, just do the same from the other folded side. I hope this is making sense. You can make it so that the pockets on both sides are the same. If so, just sew through all four thicknesses. and skip this step.
 9. Then, once you get the different sized sections on each side, fold it in the center again so that you have four thicknesses. Now, sew through both ends, down the center, and anywhere else you want for the sizes you want your pockets to be. I always make one that a check book will fit in, another for my cell phone, another for credit cards, insurance cards, etc... I also like to have a section for my pens, my lipstick and chap stick. Then, there are extra sections for miscellaneous things. On this one, there is a pocket for my camera since I've started carrying it with me almost every where I go.
 My camera fits in the pocket on the far side where the white paper is sticking up. I just put the paper in to show that there is a pocket there. I also carry a small calendar which will fit in the same pocket with my check book, or one that size.


 First, this is the organza that I found in my antique stash and just had to use. I'm using this on Riley's, too, but in a VERY different way.
 I put it through the pleater. It really went through easily. I was afraid that the flowers would not go through so well, but no problem, thank goodness!
 Then I decided to match the rows of smocking with rows of the same colors of ribbon across the back. I left these rows of ribbon very long so they can tie together to make a bow in the back, like a sash. See one of the pictures below.
 I used all French seams on this dress, even on the sleeves and slip, etc... Everywhere.
 For the neck and sleeves I cut a bias strip. I stitched it on with my machine and finished it by hand to make a narrow band. The sleeves are gathered mostly right in the center at the bottom which gives a different sort of look. I hope they look good on Emory like this. Then, I gathered a strip of the fabric, without flowers or the entredeaux design, on both edges. This strip of fabric was triple the width of the skirt. I probably would have made it fuller if I had it to do over again. I then sewed real entredeaux to both edges, and then I sewed lace beading to the outer edge of the entredeaux. I thought about weaving lavender ribbon through the beading, but decided that I liked the openess of the holes. When I attached the entredeaux I trimmed it very close to the stitching. Then, I sewed this band of gathered fabric with lace edging onto the skirt of the dress and then trimmed the fabric from behind it. This is kind of scary, because Im always afraid I'll cut something I'm not supposed to cut. I usually use my applique scissors, but I couldn't find them. I need them, so I have to look again!! I used interfacing at the back opening to support the buttons and button holes. I just realized that I took this picture before I made the buttonholes or sewed on the buttons. I put three buttons. Emory won't stay still for long, so I hope 3 buttons and a bow won't be too torturous for her and her mom.

 This is a wing needle. It makes holes in you fabric when you sew with it. I used it to hem the slip. A lot of heirloom stitches have holes. It is reminiscent of the drawn work that you see on many antique things. For the slip, which Emory can actually wear as a sundress since she lives in the desert, and it's hot all year long, I used a very soft, thin, cotton, fabric that is kind of like dotted swiss, but has little tufts of thread instead of dots. I made bloomers because Emory is 18 months old and is a real climber. I finished the arm holes and neck with a shell stitch. To do this I made a very small rolled hem and used a hemstitch or blind stitch so that the stitch that extends out went off the edge of the fabric. I also tightened my tension.


 I wasn't sure how the lavender would look under the dress and almost went with white, but I like it. I hope Emory does, too.


 Is this not gorgeous!?! When I pulled out of my driveway the other morning, I looked back toward our house, and this is what I saw. I pulled over to the side of the road and snapped this picture. What a sunrise!! See the mountains in the background? This is what we can see from the deck on the back of our house when we get up early enough to get out there and look. I love living here.


